Showing posts with label Hardware. Show all posts

Monday, March 12, 2018

Behind the camera with Reckless Amnesiac

After discussing the next big project by Reckless Amnesiac, I was offered to assist with the first two episodes of the hilarious series known as Hobo Hunters. It was a fantastic experience and I'm always honored to work with the legendary Ian Altenbaugh and Joe Bucci.

SHAMELESS PLUG: For more on the series and the creators, check out the second episode of the Decipher the Media Podcast
Photo credit: Rebekah Lehman

So, I figured it would be a good opportunity to talk about it in my blog. How did it feel to get back behind the camera after wrapping the long-in-development Body Farm? Obviously, great. To work on a comedy series that spoke to my dark sense of humor...well, that's what made this so wonderful.

We shot two episodes in one weekend. Each episode only took up a day of production (about 10 hours). Working with these gentlemen before, I know what to expect. The level of knowledge and professional demeanor of these guys was directly reflected in the quality of the production.

I was lucky enough to be one of the two on camera in a two-camera setup. It gives me a bit of envy when I work with a camera like the Blackmagic. My personal setup throughout Body Farm was a Canon EOS 6D with an L-series zoom lens, so I've always wished for something more. Unfortunately, Blackmagics were always a bit out of my price range, so it's always great to work with one on a production.

Photo credit: Rebekah Lehman

The only difficulty I experienced with this production was the physically demanding aspect of a documentary-style production. Carrying around a rig all day took a lot out of me. My shoulders and arms were extremely sore by the end of the weekend, which is probably a direct reflect of how out-of-shape I am. I guess that's more reason than ever to get back to the gym.

I'm hopeful to have a camera setup like this in the near future. In the meantime, I'm just happy that my background in camera operations still finds a use in the local community of filmmakers.
Photo credit: Rebekah Lehman


The strongest aspect of Hobo Hunters, by far, is the writing. Ian and Joe clearly know how to write something that is both hilarious and socially relevant. Sure, the comedy might not be for everyone, as it pokes fun at topics like religion and cultural stereotypes, but it does so in a way that is relevant to today's bubbling climate. It teaches you that you shouldn't take life too seriously.

It especially speaks volumes to me.Maybe this wasn't the creators' intention, but we, the audience always draw our own interpretation of an artist's work. In this case, that was my interpretation.

Maybe this will finally be the fuel I need to hop back into the world of writing after such a long hiatus. Time, always being my enemy, will tell.

In meantime, I am grateful for being involved in another project from these fine gentlemen. We'll certainly cross paths again soon.

Cheers,
Steven

Photo credit: Rebekah Lehman

Sunday, September 10, 2017

Spending some time with podcasting and recording

So, I did a thing. I've been posting all over social media about my little recording setup and starting a whole bunch of new projects. So, what exactly does it all mean? Well, to break it down, I've been toying with the idea of recording for almost two years now. Recording what? Audio and video that directly feeds into my computer. Not to be confused with location video or sound.

To elaborate, I decided to start my own podcast. While it is still in the process of taking identity, I've always wanted the experience of doing a podcast.

Previously, I have worked to produce another podcast, which was pitched to me from a friend and colleague. While he did the talking with his co-host, I was behind the scenes, monitoring the audio being recorded and the equipment that was being used.

It was a pretty basic setup. Let's start with the hardware. I purchased two USB microphones that were designed for audio recording from a desk setup. I believed that this would be a simple process. Of course, I was wrong. These mics were not designed for simultaneous multitrack recording. At that point, I had to do my research to understand the components of multitrack recording.


I concluded that I needed a mixer that could distinguish and separate the mics that we were recording on. It turns out that USB mics can't be easily integrated with such a setup. I went the cheap route and I was paying for it. Go figure.

So, I had to create a workaround where my computer's sound hardware could separate the lines going directly to the computer's board. It was crude. Very crude. And certain reverb issues would arise in this setup. At certain times, the issues would get so bad that I would have to stop the podcast recording to correct them.

Each host had their designated USB microphone. I would record audio through a multitrack session created in Adobe Audition. Alternatively, I used Audacity for simpler recording sessions. They both work just fine for what I needed to accomplish.

As I mentioned, I had to go into the properties to manually assign instructions to each of the two microphones so that Audition could detect each mic separately to record on their designated track. I don't quite remember the process, but there are instructions that I found on Google. Good ol' Google.

After a handful of episodes, I had to take the back seat with this initial podcast. The hosts chose to record their own episodes with their own equipment while I focused on more pressing matters at the time. I swore I would return to active podcasting... but then life happened. As it always does.

Besides the podcast, I tested some video capturing via software that I found online, overlaying those captures with audio that I would record on the microphone. I never published any of my tests, but I was able to confirm that it was possible with my setup.

I was capturing mainly video games via unique screen capture programs and recording my audio commentary in either Audition or Audacity. I wanted to attempt a "Let's Play" series, figuring out how to put my own spin on it as I went along. None of those old videos every surfaced and I ended up having to shelve the project and put the idea on the back-burner. Again, life happened.

It was around this time that I decided to revisit some of these old concepts and interests. I recently had the chance to record the first episode of my new podcast, Decipher the Media. While it is still a work in progress, I'm taking what I know from previous experiences to improve on my knowledge of recording.

The first episode had a lot of help from Brandon Keenan (a guest on the episode) and KVT Productions, improving the production value beyond my expectations. The setup we used would be ideal for recording and broadcasting sessions. While I plan to get there in quality, I want to focus on building the foundation of recording.

The first thing I did was remove the USB mics entirely from my setup. They were
causing too many issues with recording and were over-complicating multitrack sessions. Instead, I re-purposed some older location sound gear for my recording needs.

I learned that my Zoom H4n has the ability to split audio lines, which can then be fed into the computer on separate tracks. The H4n supports two tracks, which is just shy of what I need for podcasting. I'm hoping to have at least two guests on the podcast at all times, meaning I'll eventually need a mixer that can support simultaneous recording of three mics.

For now, I plan to rely on recording sound for an entire room until I can purchase a mixer with more mic inputs than I currently have. I'll do some tests to see how it comes out in an enclosed setting.

Which brings me to the next part. Given that my current living situation has a lot of extra space, I decided to put some of it to good use. Located on the second floor, I cleared out a small room that was once my office. I grew to despise using that room as my office, so I moved it. Why? I really don't have a good answer, but the space did give me an idea.

I've always wanted to convert a room like this into a small "recording studio". While resources (and space) were always limited in the past, I figured that timing and space provided me with the opportunity to give this little project a shot.

First, I had to clean all of the extra junk and furniture out of the room. With the wood paneling, sound was definitely going to be an issue. To combat this, I'll need get some sound
proofing tarps or foam to cover sections of the wall, minimizing any reverb for audio recording.

For furniture, I was just thinking of a simple setup. I would place a small workstation at one corner of the room. Following that, I could also have a table and chairs set up specifically for my podcasting needs.

I've also considered turning the room into a very small film/photography studio. Granted, this would be very difficult given the dimensions, but it would be perfect for certain smaller projects. I'll be posting some updates once the room is complete. There will also be some podcast updates coming to Cipher Eye Media very soon, if you guys are interested.

Until next time!

Cheers,
Steven

Tuesday, October 1, 2013

How To: Hard Drive Recovery/Repair

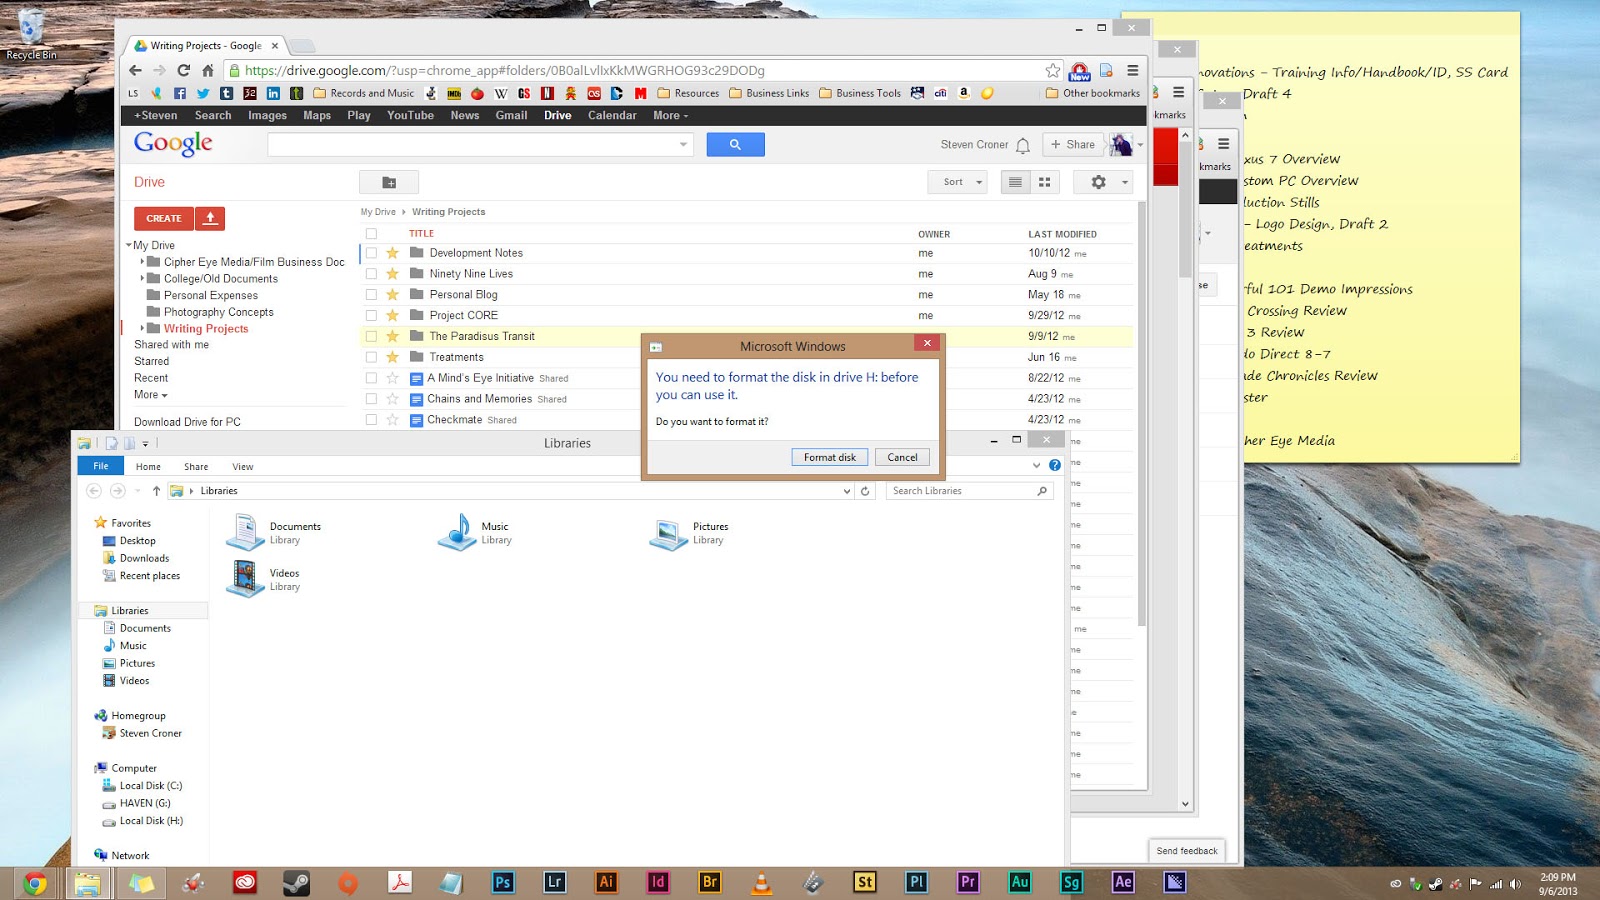
Recently, I experienced some technical difficulties with my Samsung 320GB hard drive, which I was using to transport video files from my laptop to my desktop PC. It seemed as though something had corrupted the hard drive in the transfer process, resulting in this wonderful message:


The system was unable to read the drive, believing that there is nothing on the disk. Oh, ho, ho, ho. Now what? Are those files officially gone? Not quite. Let me run through how recovered my files.

I started by searching for hard drive recovery tools and came across a nifty little program called the Minitool Partition Wizard Home Edition. This software package includes a simple interface that can be helpful for even the most casual users.

Once the program is installed, open the software. You will be given the option to access either the Partition Wizard or Data Recovery. Choose the Data Recovery option.

And...what's this? It will only recover 2GB of data, unless you pay for the software?! Yeah, this happens. Lesson number one: always watch out for software that says its "free", but once installed, limits what you can do with the software, unless you purchase the "full" version. It'll happen more than you think, so just do some thorough research and look for the hidden fees and limitations.

So, after doing some further research, I found a free version that provides a FULL recovery without paying any of your hard-earned cash. Recuva is a free software package designed for data recovery. The application can be downloaded here. On the software page, hit the big green download button. From there it will take you to the next page. Obviously, you want select the free software bundle (unless you feel like giving them your money). Select where you want to download the software from. I just chose Piriform, since they developed the software. From there, the download should automatically start. If not, you can click on the big green download button to start it. Make sure you don't have any Firewalls in place that are preventing the download from opening. Select the destination of the file and let it download.

Once complete, open the installer to begin software installation process. Once the installation is complete, allow the application to open. A recovery wizard is the first to appear. If your hard drive is completely unresponsive, then the wizard will be of little use. Go ahead and click 'Cancel' to navigate to the main recovery screen. Select your faulty hard drive from the drop-down menu and scan the drive for the missing files.


Once the software has finished scanning the hard drive and assessing the damage, a list of files should appear below the drop-down menu. They should be the files that you currently cannot access on your hard drive. Click the check box next to 'Filename' to select all the files and click the 'Recover' button. You will then need to select a destination on your computer to copy the files. The copying process will begin and may take a while, depending how much data is being recovered.
It's also worth noting that this procedure is done for a hard drive that has irreversible damage to it and cannot be accessed in its current state (with the data on it). There may be a quicker fix for a hard drive that suddenly decides to behave badly but can easily be adjusted to do its job. Google is your best friend. In any case, always consult the Google gods for the best solutions and don't always believe that the first result is the best solutions. Research a couple of methods before deciding on the best solution. This goes for any hardware/software recovery. 

If it turns out that it is an issue of hard drive REPAIR and not recovery (recovery would be for worst case scenarios), I would recommend a program called SeaTools. This allows you to check the specified hard drive and attempt to repair bad sectors of the disk. By clicking the 'Downloads' tab, you can download the program for free. After installation, you can do a simple check for errors (the interface is pretty self explanatory). If a problem occurs, the software will recommend that you run a 'Long Generic' test to repair the bad sectors. Select 'Long Generic' from the drop-down menu, then press F8 to begin the scan/fix. Once again, the scan will take a while, if there is a large amount of data on the hard drive. Be patient. Recovering those important, irreplaceable files will be worth the wait. 

If it seems like a problem beyond repair (such as in my case), then you can shell out the money to have a professional recover the drive, attempt to fix the physical components yourself (not recommended), or try the initial recovery method mentioned above (or use similar recovery software to Recuva). Hopefully, this will help for any future scenarios. Hard drive/flash failure happens, so it's important to know what to do in that situation. Most importantly, always backup your necessities onto another hard drive, so you don't have to go through the recovery process in the first place!


Wednesday, August 28, 2013

Taking "Quick" Detours

Well, I've had some good news over the past few weeks. It seems like good and bad things come in consecutive groups for me. Luckily, it was a number of good things this time around.

Image from http://www.adobe.com
I was able to get both my PC motherboard and Nexus 7 back from my repair shop. Meanwhile, after installing the PC hardware and Windows 8 (I swear it's not as bad as they say), I went straight to work on obtaining the Adobe Creative Cloud Suite. For a cool $50/month, I get the latest versions of the entire Adobe Suite, plus additional features and support not available with Creative Suite 6. Do the math... for a constantly updated, industry-standard software package with cloud support and the newest features, you're getting a lot more than you would to pay a lump sum (about $1500, depending on the package) for the Creative Suite, which, in the past, usually only lasts about a year until they come out with a newer version, forcing you to shell out more cash to keep up with the current industry-standard version. Considering the options, I think subscribing to Adobe CC is the smarter route.

Anyway, this means that I have a quality PC and quality editing software to finally start working on some serious projects! First up, my film reel. I might also post some test footage, including some GoPro footage that went on the back-burner until I figured out my whole post-production situation.


In the meantime, I will be providing full reports on new hardware and writing projects that are in the works. Stay tuned!